
How Custom Jewelry Works
This article is a great introduction for anyone new to custom jewelry or feeling a little unsure about the process.
If you've never had a custom piece made before, I'll walk you through exactly how it works at my shop.
Step 1: Book a Consultation
The first step for any custom jewelry project is scheduling a consultation. This is required for custom designs but not for loose gemstone purchases, Off-the-Shelf Settings, Ready-to-Ship pieces, or Made-to-Order listings.
Custom projects often involve a lot of questions and ideas, so a consultation helps us skip the long email chains and discuss everything directly. Consultations are 30 minutes, cost $30, and that fee is applied toward your project.

Consultation via Zoom - $30 USD
$30.00
This listing is for clients who have agreed and scheduled a consultation with me
Please use the text box to confirm the date for your consultation!
$30 usd will go towards your order
Non-refundable
Open Zoom Days + Times
PST Monday - Sunday
11AM - 8PM
Expiration date - 3 months from purchase to be used within that time frame
Please have a working connection, microphone and screen
You do not need to have a working camera
These meetings are relaxed and low-pressure. We'll talk about your ideas, the design process, timelines, and rough pricing. You don't need to have every detail figured out—there's no expectation to make final decisions during the consultation.
You don't need to turn your camera on; just have a working microphone and screen. I'll share my screen, ask questions about your vision, and walk through options with you.
Inspiration photos, Pinterest boards, sketches, or any reference images are highly encouraged! Having them ready helps us make the most of our time together and get your project off to a great start.
Step 2: Deposit
When you are ready to start, a deposit is required to start work.
I ask for 4 Installments for custom work.
*Should clients need more installments, then we can discuss details and payment timeline before we start.
Deposits include:
-Place in my queue
-Rough stone/gem material held for project (this does not include stones in my shop that are pre-cut. Clients are required to purchase their Ready To Ship stone so they are off the market)
-3 model drafts of our ring via 3d Computer Software Modeling (or CAD)
Between each draft, clients and myself will be emailing back and forth to ensure each draft has the adjustments and tweaks they are wanting.
- Email correspondence
Deposits are partially non-refundable under all circumstances as they are intended to cover work completed, including but not limited to:
Research specific to the project
CAD/computer modeling
Drawing and illustration
Email correspondence
Consultations
All physical and intellectual labor
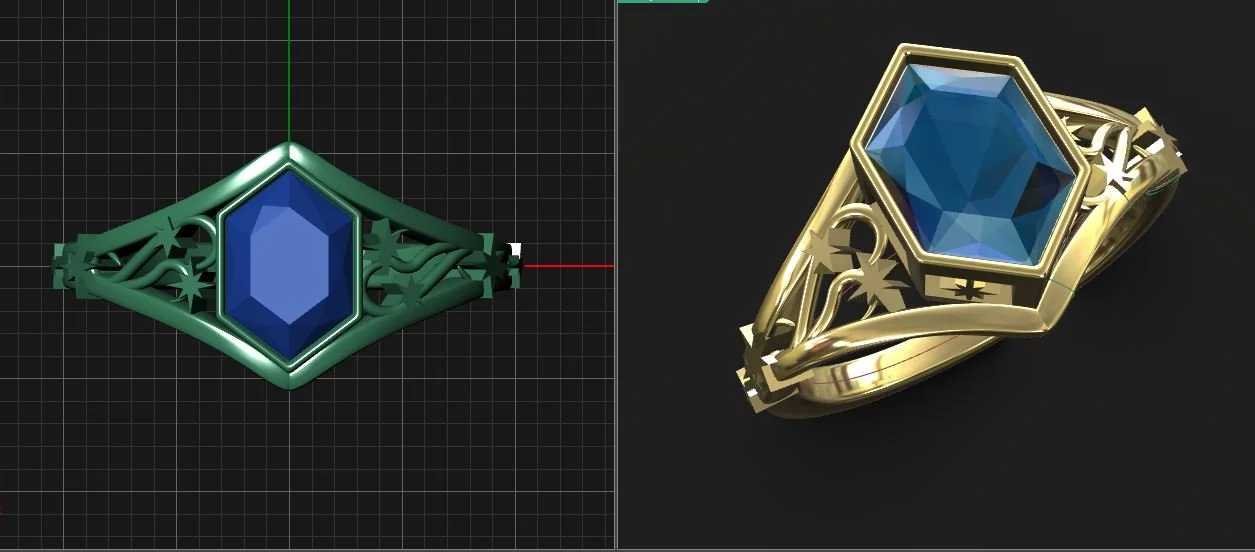
Sample of Computer Model
Step 3: 3d Ring Shipped
When the 3 Drafts are finished and we are at the final version of our jewelry, I will send my clients a 3d plastic ring model so you can ensure fit and proportion.
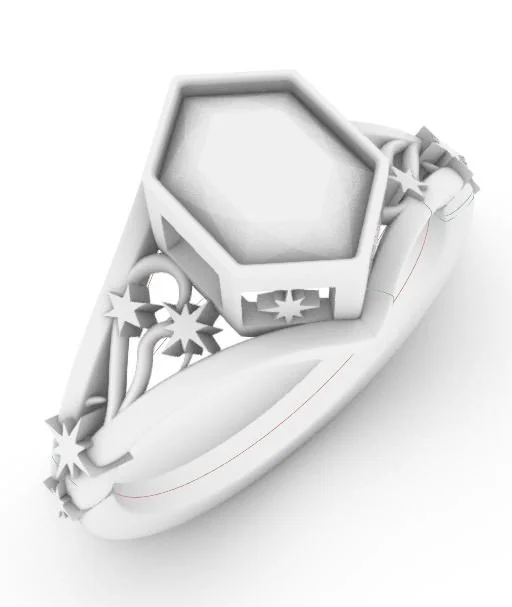
Plastic Model example